Dimensions Tab
Dimensions are an additional costing 'tag' that can be added to an employee's pay to 'tag' labour costs with additional dimensional data. Dimensions may also be known as 'Costing Codes' or 'Analysis Codes' in ERP - Enterprise Resource Management - systems. The Dimensions created in hr3 payroll can then be added to custom G/L exports to populate into your ERP system.
Dimensions do not replace the existing hierarchy in hr3 payroll: Company - State - Cost Centre - Department. Instead they are an addition to the hierarchical structure. Dimensions do not enforce any hierarchy and as such, they can be added in any combination to a costing allocation.
Example of Dimensions
Say you have a department called 'Services Direct'. An employee worked within this department for five hours one day. Previously the Dimensions 'Project' and 'Task' have been set up within the Company, so using these Dimensions you can track which project and task the employee worked on during the five hours within Services Direct.
The Dimensional allocation is available in the Data Explorer, in the Labour Costing queries, and can be reported on and filtered etc. Because the actual Dimensional captions and data are stored in your historical payroll records at the time of the payrun, it is possible to delete old Dimensions and add new ones in your Company - Dimensions without affecting the ability to report on your historical dimensional data.
Note: adding/editing/deleting the Dimension structure in a company can only be done under certain circumstances. For example, no employee screens open, no open payruns, single-user mode.
Creating and Editing Dimensions
Dimensions are defined at Company level, and you can define up to five Dimensions. You define the lookup lists of the Dimensions, and once defined you can select the required items via a drop-down list at the time of allocating the employee's pay/costing.
- In Navigator select Company | Maintain Company Details or click Company on the toolbar
 .
.
The Company screen will open. - Click on the Dimensions Tab.
- Click the Add Dimension button:
 This immediately places your cursor in the Define Dimensions | Dimension Name field.
 - Type in the required name, then tab down to the Caption field and type in the caption for the Dimension. Click the Save Dimension button:
 .
. - In the Dimension Name section, highlight the new Dimension name then click Edit Dimension.
- A warning message is displayed to notify you that future payruns and reports will be affected by the new dimension, but previous transactions will not. Click Yes to proceed.
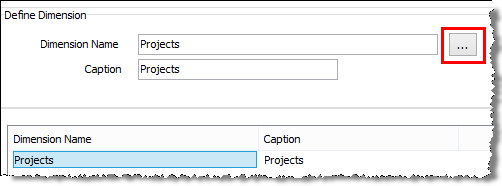
- In the Define Dimension section of the window, the selected dimension name and caption will be displayed. Click the browse button to the right of the name:

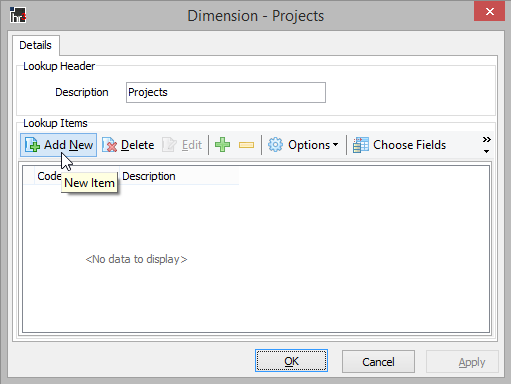
- The window that opens allows you to specify the Lookup Items to be included within the selected Dimension:

- Click Add New to open the Dimension Values window. Type in a Code and Description for the first lookup value to be included in this Dimension. Continue adding lookup values, as necessary.
For example, the Dimension 'Projects' may have various project names listed as lookup values.Note: The values that you enter here are the values that will be available for selection in the Payrun - Costing section and the Employee - Pay Items - Costing section (if relevant). Allocating Dimensions at an Employee costing level would only usually be done if the employee's costing allocations are constant on an on-going basis.
- Click OK to close the Dimension lookup values window.
- Click Save Dimension to complete the setup of the Dimension.
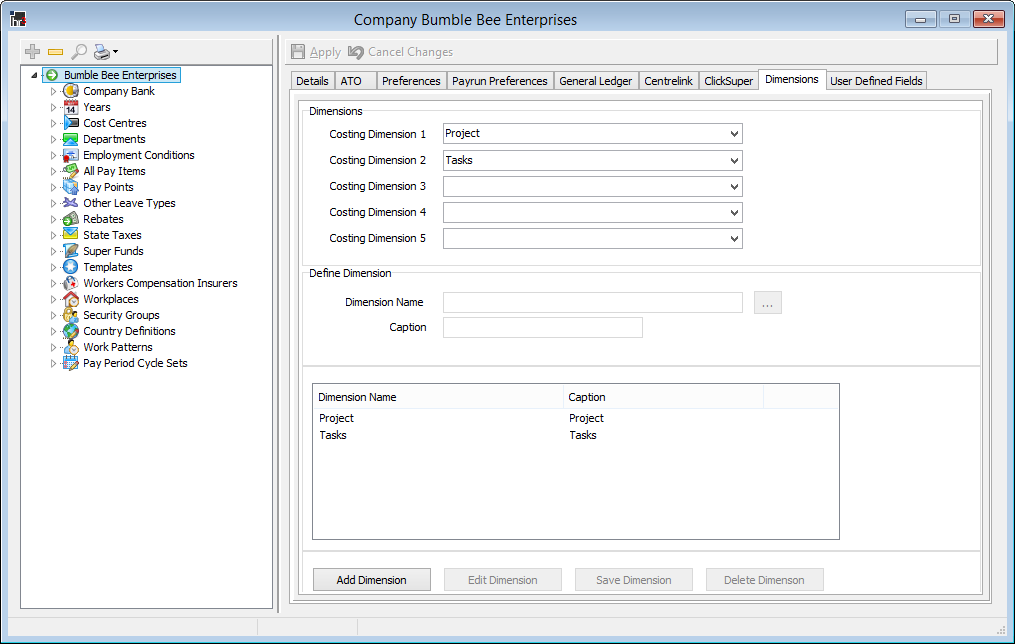
Once the Dimensions have been created and defined with lookup values, these will need to be added to the Costing Dimensions list (1 to 5) at the top of the window. This is covered in the next steps. - In the top section of the Dimensions window, click the drop-down arrow to the right of the Costing Dimension 1 field. Select the Dimension that you want to appear as the first Costing Dimension.
- Repeat for each additional Costing Dimension you want to add. If you need to reorder the list, you will need to remove names from the fields using your Delete or Backspace keys, then re-add the appropriate Dimension names.
- When your selection is complete, click Apply.
- A warning message is displayed to notify you that your changes will take effect in future payruns and reports, but they do not affect previous transactions. Click OK to proceed.
- A second warning message is displayed ensuring you wish to proceed with applying the changes to the Employee Costing records. If so, click Yes.
Deleting Dimension
- In the top section of the window, remove the Costing Dimension entry for the relevant dimension, using your Delete or Backspace key.
- After removing the relevant entry in the Costing Dimension list, click Apply.
- The two warning messages are displayed, checking you wish to proceed. Once you click OK then Yes, any lower Costing Dimension entries will be moved up automatically to ensure there are no gaps in the Costing Dimension list.
- Next you delete the Dimension itself. In the Dimension Name section, highlight the relevant Dimension name then click Delete Dimension.
- A warning message is displayed reminding you that the process cannot be undone. If you wish to proceed, click Yes.
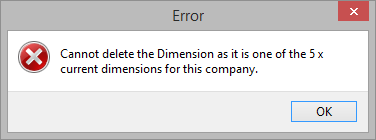
Note: If you attempt to delete a dimension before it has been removed from the Costing Dimensions list, this error message will be displayed:


